

how to add a light switch
 Family Handyman
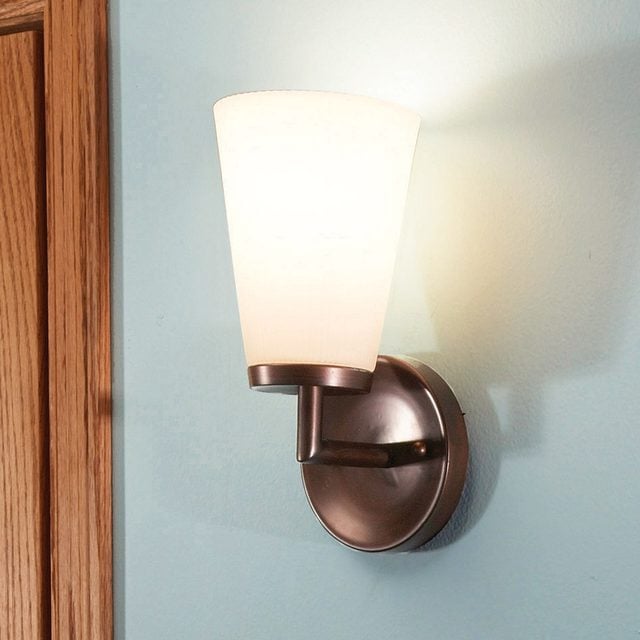
Is your bathroom dimly lit? Do you have a hallway that could use more light? Here's how to install a wall-mounted light directly above a light switch.
This project requires an understanding of how a switch is wired and a few basic tools. You'll need a noncontact voltage detector, a wire-stripping tool, a screwdriver and a drywall saw. Then, with our instructions and a few hours' work, you'll be able to add a sconce to any room that has an appropriate switch.
Not all electrical boxes with a light switch in them contain the necessary ground, hot and neutral conductors. To find out, first shut off the power to the switch at the main electrical panel. Then remove the switch cover, and hold the noncontact voltage detector against the wires attached to the switch. This is to ensure the power is off before you remove the screws and pull the switch from the box.
To locate the required neutral, look for two or more white wires joined with a wire connector. If the only white wire entering the box is connected to the switch, then there's no neutral and you can't power a sconce from this box. If your switch wiring looks different from what we show here and you don't understand how it's connected, put everything back together and abandon the project or call a licensed electrician.
There's one more important test you must complete while the power is still turned on. With the light switch turned off, hold the noncontact voltage detector against each of the wires connected to the switch. Take note of which wire causes the tester to light up. This is the hot wire and the one you'll connect to the "hot" side of the new double switch. If you're adding a separate single switch, this is the wire you'll use to power both switches. Now turn off the power to the switch at the main electrical panel. Back at the switch box, test once again to make sure the power is off and mark the hot wire with a wrap of black electrical tape.
Finally, complete a simple calculation to see if the existing switch box is large enough to accept more wires.
After you've determined that the existing switch box will work to power the new light, it's time to shop for the sconce and pick up the remodeling box, cable and electrical connectors you'll need. Choose the fixture first. Then pick a rectangular or round remodeling box that is small enough to be covered by the light fixture canopy. You'll need enough cable to reach from the switch to the box plus about 3-ft. Match the cable, either 14-2 or 12-2, to the existing wire gauge. Fourteen-gauge wire is as thick as a dime and 12-gauge wire is as thick as a nickel.
Cut the hole and run the cable
Locate the studs. Then hold the fixture against the wall somewhere between the studs to determine the best location and lightly mark the top and bottom of the canopy with a pencil. Center the remodeling box on the marks and mark the box cutout carefully, taking note of notches needed for the clamps and other protrusions. Cut out the hole (Photo 2). Next, punch out one of the knockouts in the top of the switch box and push the cable up to the hole (Photos 3 and 4). Prepare the remodeling box for mounting by stripping about 12-in. of sheathing from the cable and pushing it into the box through one of the cable entry points on the back. Make sure at least 1/4-in. of sheathing is visible inside the box. Leave some slack cable inside the wall to allow some leeway when you connect the switch (Photo 5). Then fit the remodeling box into the hole and tighten the clamps.
Connect the fixture and switch
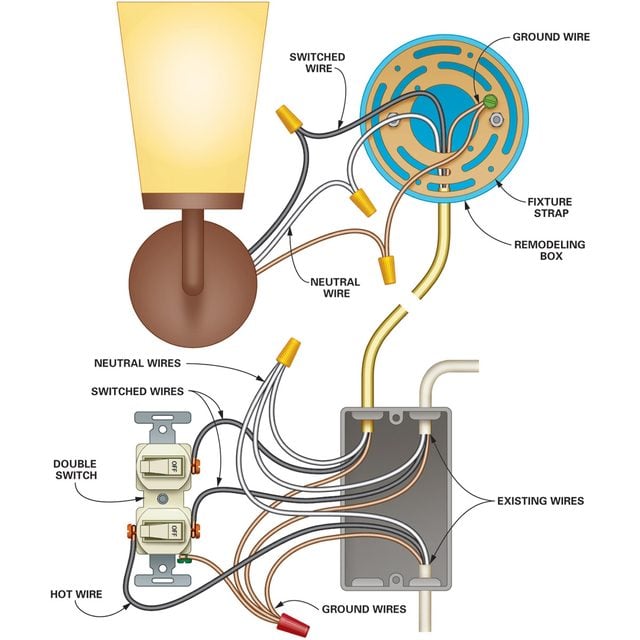
Photo 6 and Figure A show how to connect the light fixture. Start by mounting the fixture strap to the box. Strip the ends of the wires and connect them to the fixture.
At the switch, cut the cable about 12-in. beyond the box. Strip 8 in. of sheathing from the wires and push the cable through the knockout, leaving 1/4-in. or more sheathing visible inside the box. Trim the black and white wires to the same length as the wires they will connect to. Then strip the ends of the wires. Connect the white neutral wires with a wire connector. Connect the wires as shown in Figure A. Connect the hot wire to the side of the double switch that has the "jumper tab" between the terminals (Photo 7). Complete the project by mounting the light fixture, screwing the switch to the box, and installing the cover plate.
What If You Have To Go Fish?
We're showing how to run a cable through the same stud space that contains the switch. Positioning the light in an adjacent stud space is more difficult.
Figure A: Wiring Diagram
 Family Handyman
Use a double switch to power two different fixtures. The existing box must contain a neutral line that's not connected to the switch.
how to add a light switch
Source: https://www.familyhandyman.com/project/how-to-add-a-light/
Posted by: belangerawor1940.blogspot.com
0 Response to "how to add a light switch"
Post a Comment